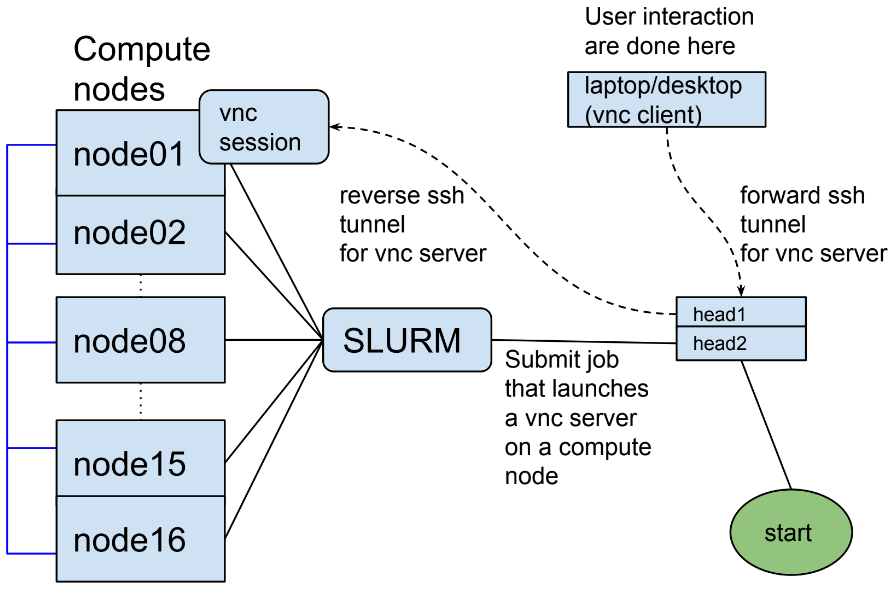
Interactive jobs - Desktop environment on a compute nodes#
Interactive jobs give the user a desktop like environment on a compute node.
Such jobs are useful for tasks where user interactions / input are needed.
For example, although matlab or Ansys Fluent jobs can be run as
batch jobs through the command line or scripts, sometimes interacting with their
GUIs is necessary.
Prerequisites#
For Windows, download the portable version of RealVNC Viewer. The portable version does not require admin rights to run.
Recommended workflow#
Create the VNC configuration. This step is done when the account is created and hence can be skipped. Execute the procedure described there if your VNC configuration does not exist or is corrupted.
submit the job script ( e.g
sbatch job.sh)Get the port number after the job starts running from e.g slurm-166866.out get the VNC port number
VNC_HEAD_PORT = 5201.connect using a vnc viewer to the vnc session running on the compute using e.g
localhost:5201
An interactive job on a compute node#
When the interactive job script is submitted, a vnc session is created on the compute node. The session is terminated when the job exits or when the job is killed.
To connect to the vnc session using a vnc viewer (client) a tunnel to the
VNC_HEAD_PORT that is specified in the job script below should be created.
details#
Create/edit folder and files#
first check if the folder
.vncexists and has the following two files:xstartupandconfigby executing:ls ~/.vncthe output should show
config xstartupIf these files don’t exist, create them by copying the settings from a pre-defined directory on the shared filesystem
/home/shared/sample_scripts/slurm_vnc_jobrm -fvr ~/.vnc cp -fvr /home/shared/sample_scripts/slurm_vnc_job/.vnc ~/ chown -Rc $USER ~/.vnc cp /home/shared/sample_scripts/slurm_vnc_job/job.sh ~/
set the vnc password by executing the command (set a strong password that is at least 12 characters long)
vncpasswd
# optionally set a view only password
submit the job#
The following job script can be used as a template and the resources options
can be changed to meet the demands of a particular simulation. This job
script is also included in ~/.vnc folder. After submitting the job, the
VNC_HEAD_PORT is written to the slurm-JOBID.out file.
#!/bin/bash

## specify the job and project name
#SBATCH --job-name=my_job_name
#SBATCH --account=abc123

## specify the required resources
#SBATCH --partition=normal
#SBATCH --nodes=1
#SBATCH --ntasks-per-node=1
#SBATCH --cpus-per-task=8
#SBATCH --mem=4000
#SBATCH --time=0-01:00:00
#SBATCH --mail-type=ALL
#SBATCH --mail-user=abc123@mail.aub.edu

### DO NOT EDIT BEYOND HERE UNLESS YOU KNOW WHAT YOU ARE DOING
source ~/.bashrc

VNC_HEAD_PORT=$(random_unused_port)
echo "VNC_HEAD_PORT = ${VNC_HEAD_PORT}"

JOB_INFO_FPATH=~/.vnc/slurm_${SLURM_JOB_ID}.vnc.out
rm -f ${JOB_INFO_FPATH}

VNC_SESSION_ID=$(vncserver 2>&1 | grep "desktop is" | tr ":" "\n" | tail -n 1)
echo ${VNC_SESSION_ID} >> ${JOB_INFO_FPATH}

ssh -R localhost:${VNC_HEAD_PORT}:localhost:$((5900 + ${VNC_SESSION_ID})) ohead1 -N &
SSH_TUNNEL_PID=$!
echo ${SSH_TUNNEL_PID} >> ${JOB_INFO_FPATH}

sleep infinity
A copy of this file can be obtained from /home/shared/sample_scripts/slurm_vnc_job/job.sh.
Altenatively create the file in your ~/ directory. The script can be submitted
the usual way using sbatch.
Create a ssh tunnel#
On a local terminal, use the VNC_HEAD_PORT written to the slurm-JOBID.out
file to create the tunnel. The tunnel can be created using other application such
as mobaxterm using its graphical user interface.
ssh -L localhost:<VNC_HEAD_PORT>:localhost:<VNC_HEAD_PORT> <user>@octopus.aub.edu.lb -N
Connect using a vnc viewer (client) to the ssh tunnel on localhost#
If you’re using RealVNC type in localhost:<VNC_HEAD_PORT>
or on MobaXterm, session -> VNC:
Remote hostname or IP address:
localhostport:
<VNC_HEAD_PORT>
Using novnc in the browser#
The process for using noVNC in the browser is similar to using a VNC viewer but simpler. The noVNC approach does not require downloading the VNC client software. Instead, it allows you to access the VNC session directly from a web browser.
Workflow#
Create the VNC configuration. [one time] This step is done when the account is created and hence can be skipped. Execute the procedure described there if your VNC configuration does not exist or is corrupted.
[one time] set a vnc password if you have not done so by executing the command
vncpasswd(set a strong password that is at least 12 characters long)
Copy the following job script to your home directory submit the job script ( e.g
/home/shared/sample_scripts/slurm_vnc_job/novnc_slurm_job.sh) or create a new file by copying it from the job script below, edit it to change the resources options and submit it usingsbatch. In either case edit the job script and use your account name instead ofabc123.After the job start check the output slurm file, the content should be similar to the following:
sourced .bashrc-prompt
VNC_HEAD_PORT = 3091
NOVNC_HEAD_PORT = 3092
vnc session 5 is running on VNC port 5905
novnc listen port 6085
create the ssh tunnel to the web UI with
   ssh -L 3092:localhost:3092 abc123@octopus.aub.edu.lb -N
use the following url to access the desktop via novnc:
   http://localhost:3092/vnc.html
going to sleep indefinitely to keep the job alive...
Create the tunnel by pasting the ssh command above in your local terminal (e.g bash or cmd)` not on the cluster. For every job the port number is different, so make sure to copy/paste the content of the output of the slurm job.
ssh -L YOUR_PORT:localhost:YOUR_PORT abc123@octopus.aub.edu.lb -N
#in the example above, YOUR_PORT is 3092 and the command is
ssh -L 3092:localhost:3092 abc123@octopus.aub.edu.lb -N
Connect to the session by pasting the url in your web browser (e.g chrome, firefox, edge). For every job the port number is different, so make sure to copy/paste the content of the output of the slurm job.
http://localhost:YOUR_PORT/vnc.html
#in the example above, YOUR_PORT is 3092 and the url is
http://localhost:3092/vnc.html
Submit the job#
The following job script can be used as a template and the resources options
can be changed to meet the demands of a particular simulation. This job
script is also included in ~/.vnc folder. After submitting the job, the
VNC_HEAD_PORT is written to the slurm-JOBID.out file.
#!/bin/bash

#SBATCH --job-name=novnc
#SBATCH --account=abc123

## specify the required resources
#SBATCH --partition=normal
#SBATCH --nodes=1
#SBATCH --ntasks-per-node=1
#SBATCH --cpus-per-task=4
#SBATCH --mem=4000
#SBATCH --time=0-01:00:00
#SBATCH --mail-type=ALL
#SBATCH --mail-user=abc123@mail.aub.edu

/home/shared/sample_scripts/slurm_vnc_job/vnc_novnc_wrapper.sh