Python#
The python environment can be activated using the command:
module load python/3
Most of the python environment are set up based on anaconda in the
/apps/sw/miniconda/ directory.
Users who wish to extend/create custom python these environment can:
use the flag
--userwhen using pip. For example to installipythona user can issue the command:pip install --user ipythonThis will install
ipythonto~/.local/lib/python3.7/site-packages. Users can check whether the imported package is the one installed in their home directory by importing it and printing it, e.gimport IPython print(IPython) >>> <module 'IPython' from '/home/john/.local/lib/python3.7/site-packages/IPython/__init__.py'>a similar approach can be done for
anacondaenvironments.
new conda environment in a custom location
conda create --prefix /home/john/test-env python=3.8
virtualenvsare by default created in the home directory~/.virtualenvs. It might be also useful to use the packageVirtualenvwrapper.use
pipenvthat is a new and powerful way to creating and managing python environments. The following is an excellent guide on getting started withpipenvhttps://robots.thoughtbot.com/how-to-manage-your-python-projects-with-pipenvinstall anaconda locally in their home directories
compile and install
pythonfrom source. This is non-trivial and requires good knowledge of what the user is doing, but gives full control on the build process and customization of python. For optimal performance, this is the recommended approach.
Jupyter notebooks#
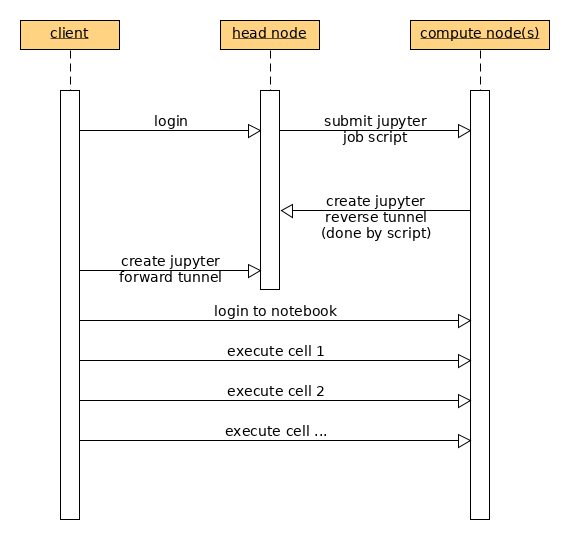
A jupyter lab server is run on a compute node to which a user can connect to using a browser on the local machine (i.e laptop/desktop/terminal).
submit the jupyter server script using
sbatch(see below)get the port number from jupyter-${MY_NEW_JOB_ID}.log after the job stars running
create the tunnel to Octopus
get the URL with the autnetication token from jupyter-${MY_NEW_JOB_ID}.log and use that link (with the token) in your browser
Jupyter notebook job on a compute node#
The following job script can be used as a template to submit a job.
#!/bin/bash

#SBATCH --job-name=jupyter-server
#SBATCH --partition=normal
#SBATCH --account=my_account

#SBATCH --nodes=1
#SBATCH --ntasks-per-node=1
#SBATCH --cpus-per-task=1
#SBATCH --mem=8000
#SBATCH --time=0-01:00:00
#SBATCH --account=foo_project

source ~/.bashrc

module purge
module load python/3

JUPYTER_PORT=$(random_unused_port)

jupyter-lab  --no-browser --port=${JUPYTER_PORT} > jupyter-${SLURM_JOB_ID}.log 2>&1 &
ssh -R localhost:${JUPYTER_PORT}:localhost:${JUPYTER_PORT} ohead1 -N
Connect to the jupyter server from a client#
After the job is submitted it is possible to connect to the jupyter server (that is running on the compute node) using ssh tunnels from your local client machine’s web browser. To create the tunnel, execute (on your local terminal)
$ ssh -L localhost:38888:localhost:38888 octopus.aub.edu.lb -N
After creating the tunnel, you can access the server from your browser by
typing in the url (with the token) found in jupyter.log (see previous
section)
The diagram for the steps involved is:
Running production jobs with Jupyter notebooks#
Using Jupyter notebooks through the browser as described above requires a contineous and stable connection to the HPC cluster (to keep the ssh tunnel alive). When connected from inside the campus network, such issues are minimal. However the connection might experience instability and could get disconected especially when there are no user interactions with the notebook, e.g when running a production job when the user is away from the terminal.
After developing a Jupyter notebook (through the browser), production jobs
can be runs in batch mode by executing the notebook. Such execution does
not require interactions with the notebook through the browser. The following
template job script can be used to execute the input notebook and
the executed notebook is saved into a separate one where it can be retrieved
from the cluster and examined elsewhere, i.e the notebook with the results
are saved and no resources or gpu would be needed to view the results.
Note
no ssh tunnel is required for executing the notebook
#!/bin/bash

#SBATCH --job-name=jupyter-server
#SBATCH --partition=normal

#SBATCH --nodes=1
#SBATCH --ntasks-per-node=1
#SBATCH --cpus-per-task=1
#SBATCH --mem=8000
#SBATCH --time=0-01:00:00
#SBATCH --account=foo_project

## load modules here
module load python/3

## execute the notebook
jupyter nbconvert --to notebook \
  --ExecutePreprocessor.enabled=True \
  --ExecutePreprocessor.timeout=9999999 \
  --execute my_production_notebook.ipynb --output my_results.ipynb