The Ansys Fluent environment#
Overview#
Ansys Fluent is a computational fluid dynamics (CFD) software tool used for modeling fluid flow and heat transfer in complex geometries. It is widely used in various industries, including aerospace, automotive, chemical processing, and energy, to simulate and analyze fluid dynamics phenomena.
Fluent can be used on octopus in both shared memory (SMP) and distributed
memory (MPI) modes. It is possible to run simulations using multiple nodes
for large-scale problems using up to 256 cores and 1 TB of RAM per simulation.
It can be used also to run parameteric sweeps of simulations using multiple “small”
simulation. For example 64+ simulation can run simultaneously each using 4 cores
and 16 GB of RAM. If multiple partitions are used it is possible to run even more
simulation.
Fluent can run both in batch mode and through a gui using a VNC session.
It is recommended to run production simulations in batch mode, while for
setting up the simulations the gui mode is more user friendly.
It is recommended to use the gui mode for setting up the simulations in short jobs or ideally
the simulation setup can be done on a local machine and then the case and data files
can be transfered to octopus for the actual simulation runs.
Fluent versions on octopus#
To find the available versions of fluent on octopus, use the following command in a terminal:
$ module spider fluent

ansys/fluent/R2020.1
ansys/fluent/R2021.2
ansys/fluent/R2024.1
ansys/fluent/R2025.1    # runs in a container ( contact it.helpdesk for access )
ansys/fluent/17.2
ansys/fluent/18.2
ansys/fluent/19.0
To load a specific version of fluent, for example version R24.1`, use the following command
in your job script or in a terminal in case of an interactive job:
$ module load ansys/fluent/R2024.1
Fluent workflows on octopus#
VNC gui desktop session for developing and testing models.
Batch mode using python scripts on a compute nodes for production runs.
Batch mode on compute nodes for production runs using journal files.
Run Fluent in a VNC desktop session#
Running Fluent with a graphical user interface (GUI) on compute nodes is recommended mainly for developing
and testing models. The jobs should are recommended to be submitted to the normal partition with
a maximum walltime of 3 hours.
Warning
Running GUI applications on compute nodes can consume significant resources and may impact the performance
of other users on the cluster. It is advisable to use GUI applications sparingly and only when necessary.
Ensure that once the GUI session is no longer needed, the job is terminated promptly to free up resources
using scancel <job_id>.
Below are some suggested steps for a simulation development workflow using Fluent with VNC on compute nodes:
allocate a vnc session using the job script below
connect to the vnc session from your local machine using an ssh tunnel
load the desired version of fluent using the module command
start the fluent launcher by executing
fluentorrunwb2in a terminal within the vnc sessiondevelop and test the model / simulation
save the case and data files
terminate the vnc session and the job using
scancel <job_id>
Job script template#
The following job script template can be used (for a VNC session):
#!/bin/bash

## specify the job and project name
#SBATCH --job-name=my_fluent_job
#SBATCH --account=abc123

## specify the required resources
#SBATCH --partition=normal
#SBATCH --nodes=4
#SBATCH --ntasks-per-node=8
#SBATCH --cpus-per-task=1
#SBATCH --mem=64000
#SBATCH --time=0-06:00:00

### DO NOT EDIT BEYOND HERE UNLESS YOU KNOW WHAT YOU ARE DOING
source ~/.bashrc

VNC_HEAD_PORT=$(random_unused_port)
echo "VNC_HEAD_PORT = ${VNC_HEAD_PORT}"

JOB_INFO_FPATH=~/.vnc/slurm_${SLURM_JOB_ID}.vnc.out
rm -f ${JOB_INFO_FPATH}

VNC_SESSION_ID=$(vncserver 2>&1 | grep "desktop is" | tr ":" "\n" | tail -n 1)
echo ${VNC_SESSION_ID} >> ${JOB_INFO_FPATH}

ssh -R localhost:${VNC_HEAD_PORT}:localhost:$((5900 + ${VNC_SESSION_ID})) ohead1 -N &
SSH_TUNNEL_PID=$!
echo ${SSH_TUNNEL_PID} >> ${JOB_INFO_FPATH}

slurm_hosts_to_fluent_hosts

sleep infinity
Running Ansys Fluent#
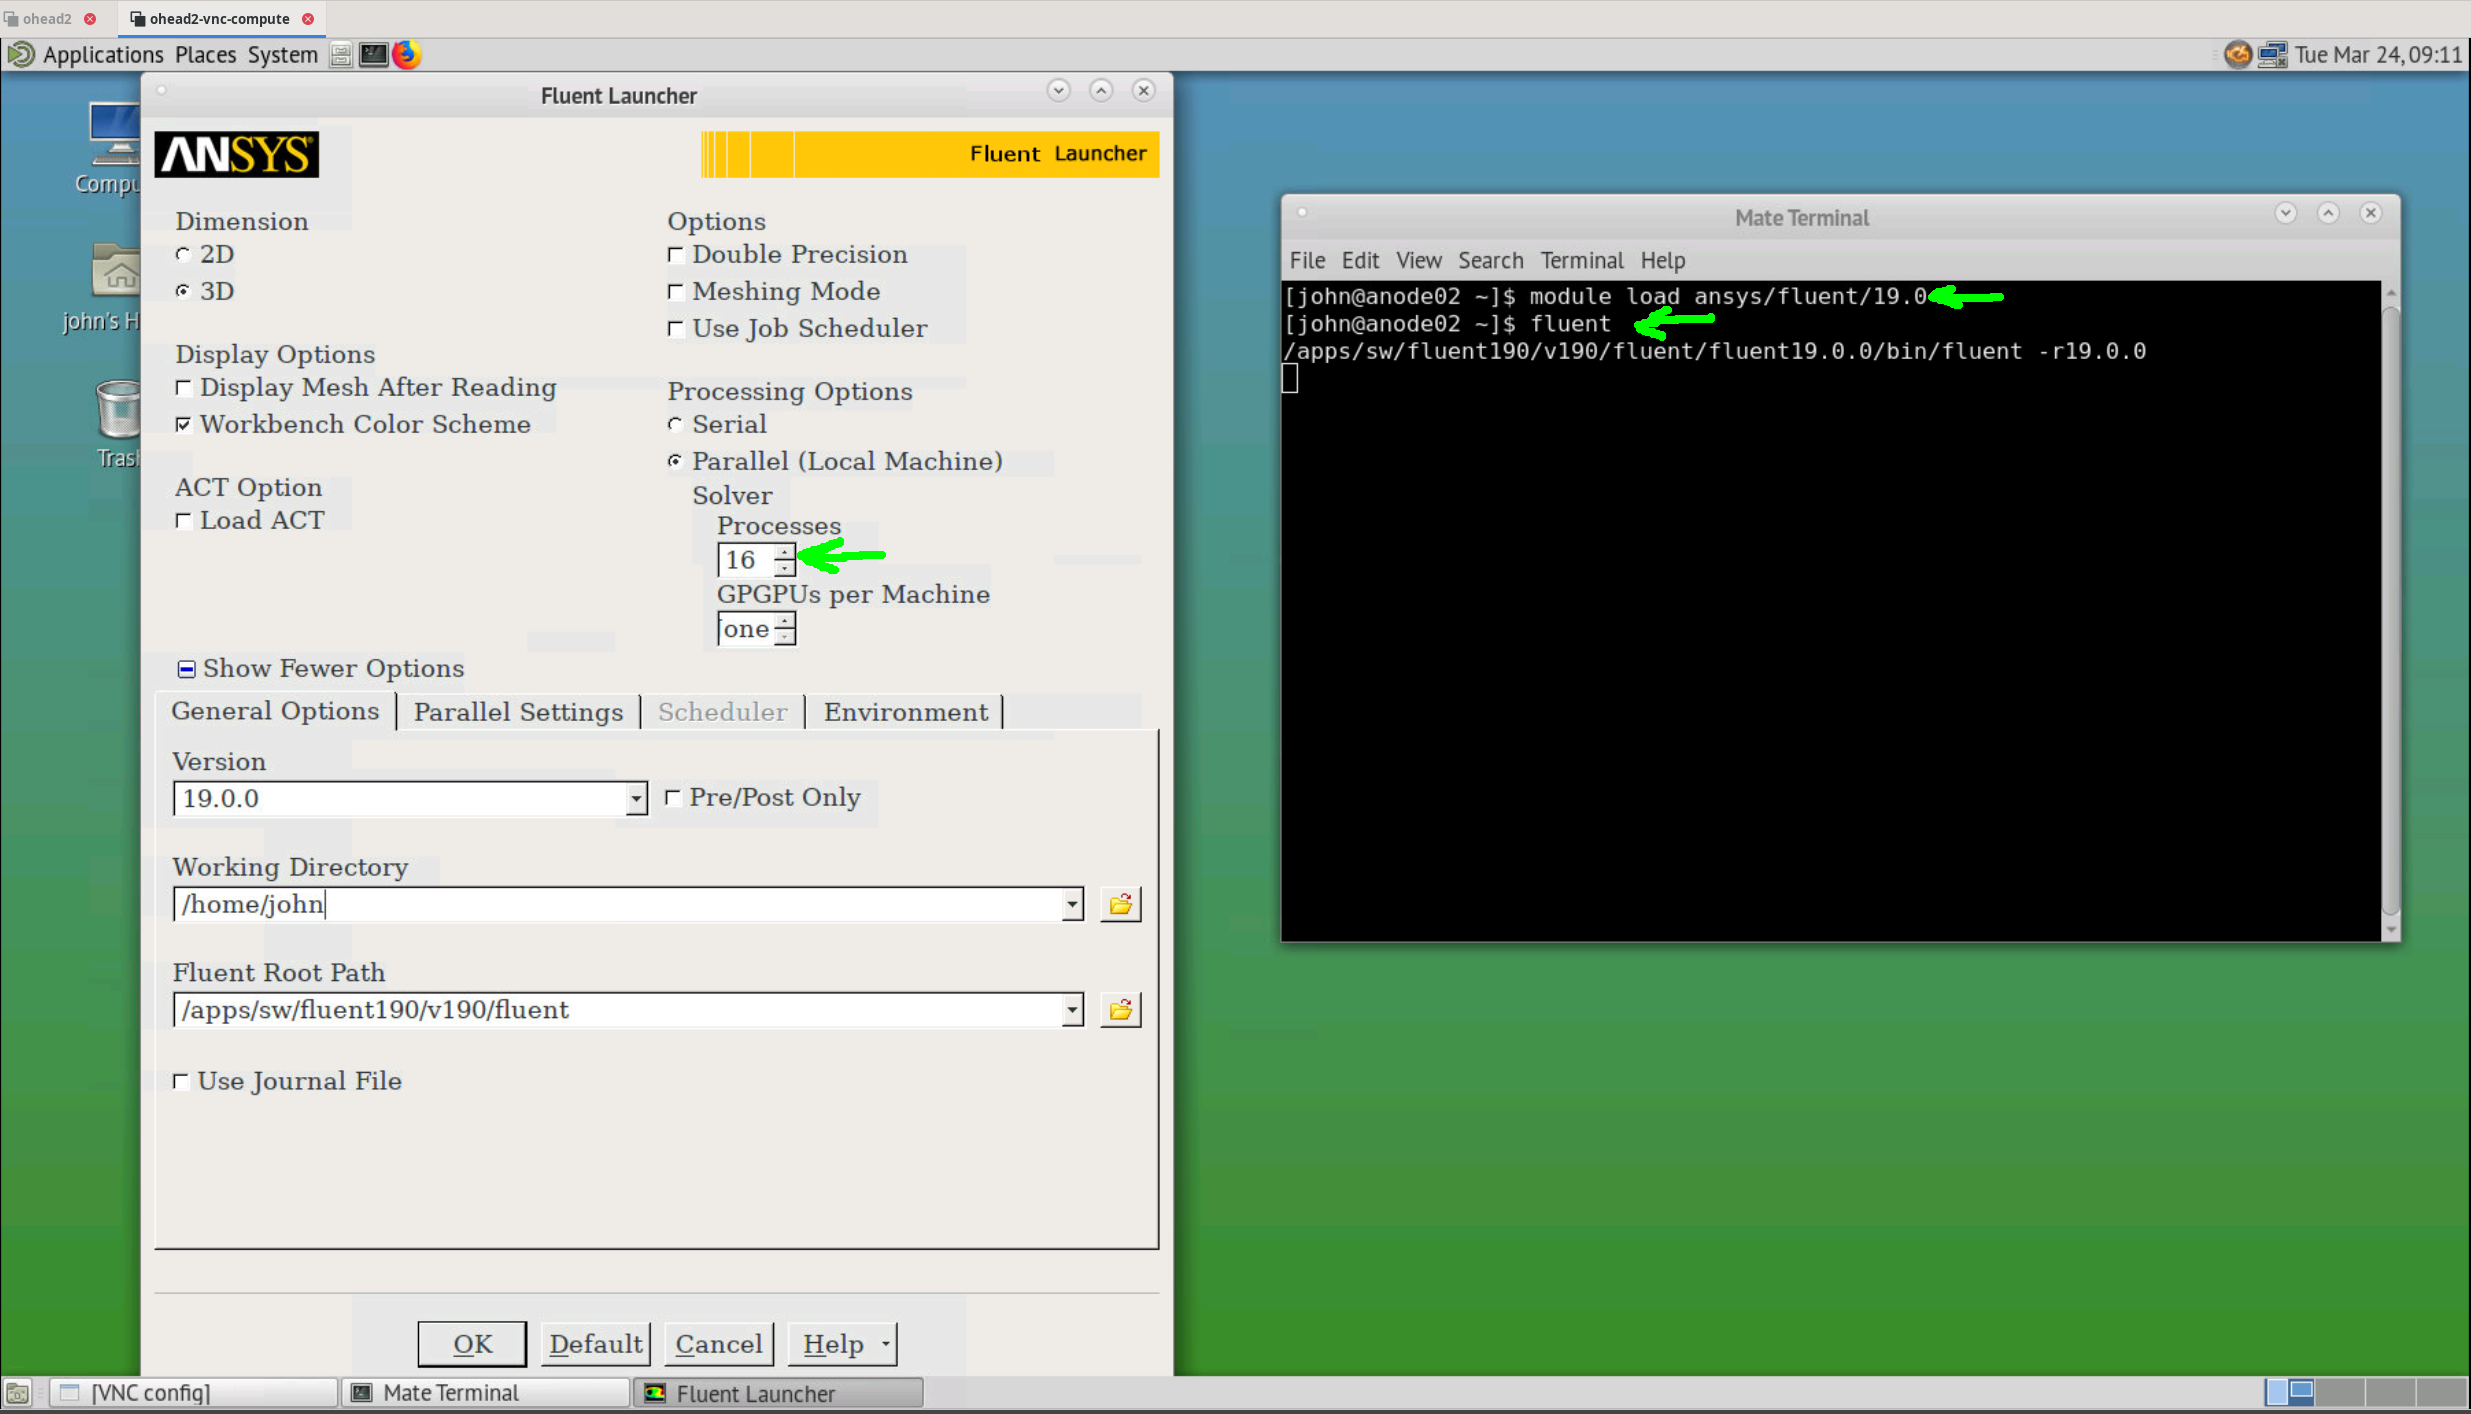
Fluent in shared memory mode#
To run Fluent in local mode using one or multiple cores on the same machine, execute:
$ module load ansys/fluent/19.0
$ fluent
in a terminal, the Fluent launcher should open in the desktop
Note
use #SBATCH --nodes=1 in the job script.
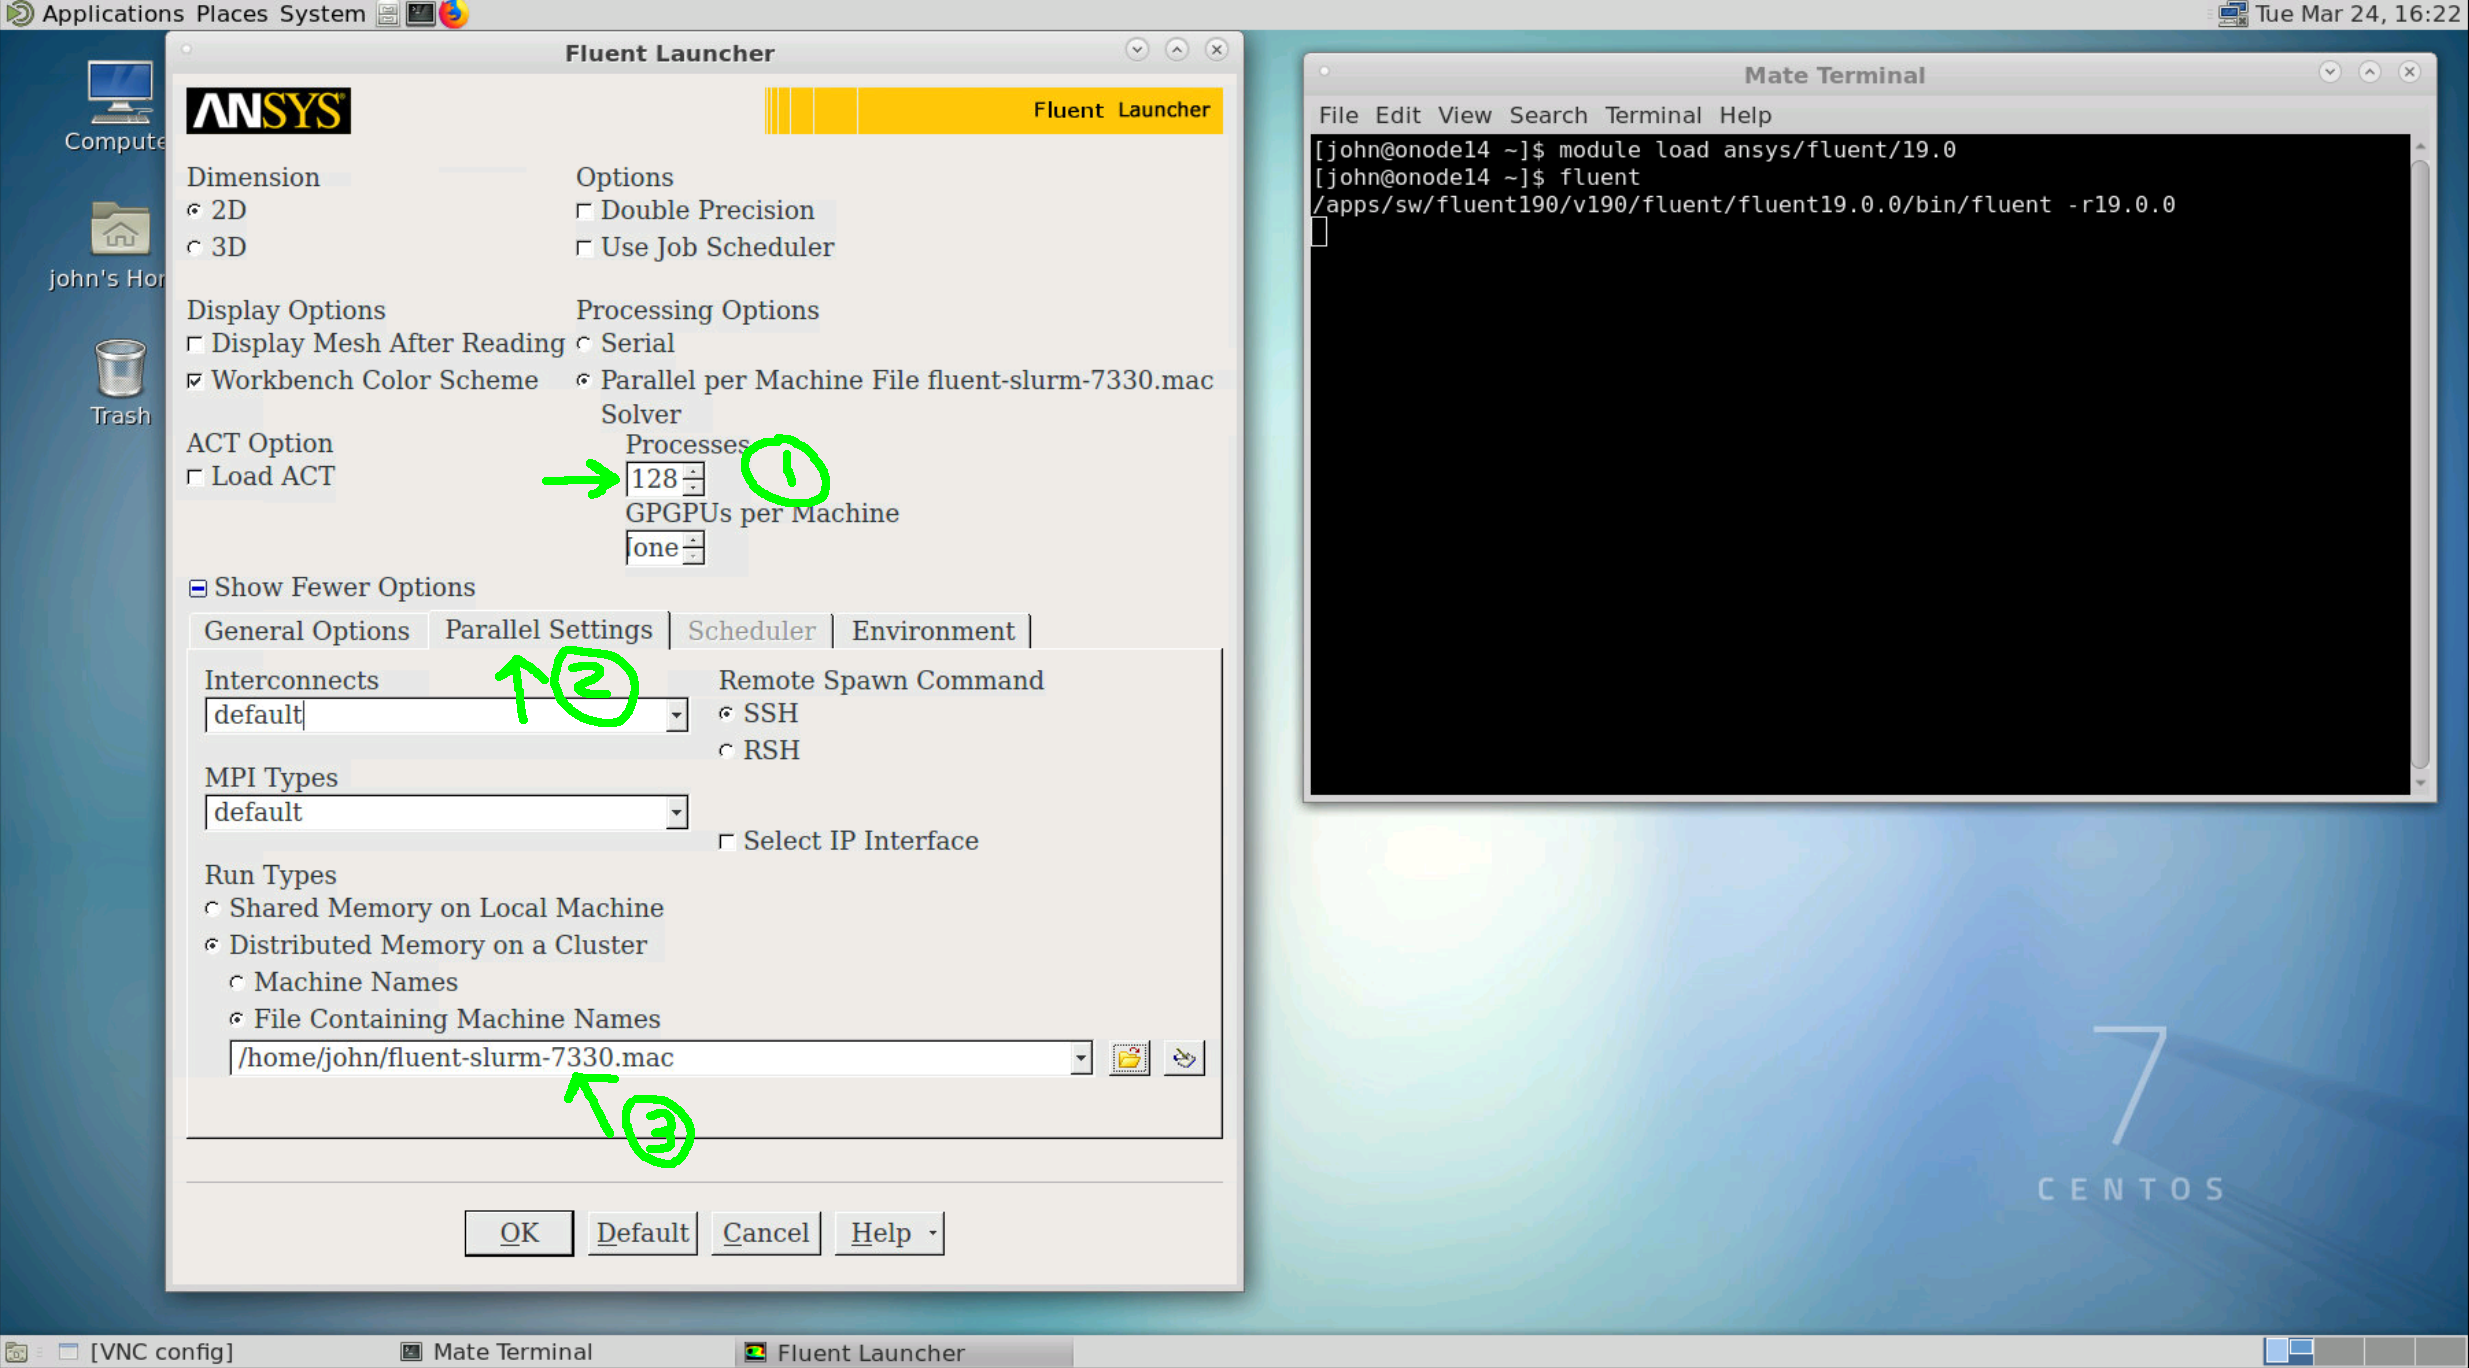
Fluent in distributed mode#
For simulations that do not fit in a single node, Fluent can automatically
allocate resources on multiple nodes. In this case the following steps must be
followed:
open the
fluentlaucher in the same procedure done for shared memory modeselect the number of cores (step 1 in the figure below)
click on the
Parallel Settingstab (step 2 in the figure below)set the
File Containing Machine Names(step 3 in the figure below). Each job will have a different file name that is prefix by the slurm job id.
Note
For example to use four nodes use #SBATCH --nodes=4 in the job
script to use for node. To run a simulation on 128 cores you can use:
#SBATCH --nodes=4and#SBATCH --ntasks-per-node=32, this will allow you to use up to 1024 GB ram.
#SBATCH --nodes=2and#SBATCH --ntasks-per-node=64will grant you access to 512 GB ram.
Batch python scripts#
Fluent simulations can be run in batch mode using python scripts through the fluent
python package (pyfluent). This functionality can be used
to run regular simulations, adjust and setup simulations and run parametric sweeps of simulations.
The official fluent python package documentation can be found on the official ansys website https://fluent.docs.pyansys.com/ . It is recommended to read the examples page.
Below is an example python script that reads a mesh file, sets up a simple simulation and runs it. This example is just for demonstration purposes and as a starting point for more complex simulations.
# %% script that changes a boundary condition parameter and runs a simulation
# The following steps are done:
# 1) load a mesh file
# 2) list all boundary zones and their types
# 3) change a parameter of a specific boundary zone
# 4) initialize the solution
# 5) run the simulation for a set number of iterations

# %%
import ansys.fluent.core as pyfluent

# %%
mesh_fpath = '../Room-AC_3D_Mesh.msh.gz'

# read the mesh file
session = pyfluent.launch_fluent(mode='solver', processor_count=4)
session.tui.file.read_case(mesh_fpath)

# %% define a utility function that list all boundary zones and their types
# list the zones
bc = session.settings.setup.boundary_conditions

# fluent boundary types (as of Fluent 2024 R1)
BOUNDARY_TYPE = [
    "wall",
    "velocity_inlet",
    "pressure_inlet",
    "mass_flow_inlet",
    "pressure_outlet",
    "mass_flow_outlet",
    "outflow",
    "symmetry",
    "axis",
    "fan",
    "intake_fan",
    "exhaust_fan",
    "inlet_vent",
    "outlet_vent",
    "porous_jump",
    "interface",
    "periodic",
    "shadow",
    "interior",  # not a "BC" you set, but often useful to include for completeness
]

def get_all_boundary_zones(bc):
    """Retrieve all boundary zones from the BC settings and group them by type."""
    zones_by_type = {}
    for boundary_type in BOUNDARY_TYPE:

    obj = getattr(bc, boundary_type, None)
    if obj is None:
        continue
    try:
        names = obj.get_object_names()
    except Exception:
        # some containers may be inactive depending on solver/physics
        continue

    if names:
        zones_by_type[boundary_type] = list(names)

    return zones_by_type

# %% get all the zones grouped by type and print them and change the mass flow rate
# for one of the inlet zones
zones_by_type = get_all_boundary_zones(bc)
print("boundary zones by type:")
for btype, znames in zones_by_type.items():
    print(f"{btype}: {znames}")

# change the mass flow rate of the ac_inlet_vent zone
ac_inlet_vent = bc.mass_flow_inlet["ac_inlet_vent"]

# change the mass flow rate to 0.1 kg/s
ac_inlet_vent.momentum.mass_flow_rate.value = 0.1

# %% initialize the solution using standard initialization from all zones and run 200 iterations
solution = session.settings.solution
init = solution.initialization
init.compute_defaults(from_zone_type="all-zones", from_zone_name="all-zones")

# choose "Standard Initialization"
init.initialization_type = "standard"

# initialize the flow field
init.standard_initialize()

# run iterations (steady) / or whatever your framework wants
solution.run_calculation.iterate(iter_count=200)
To run the above script on octopus, save it to a file called fluent_simulation.py and create
a job script as shown below:
#!/bin/bash

#SBATCH --job-name=test-job
#SBATCH --account=abc123

#SBATCH --partition=normal
#SBATCH --nodes=1
#SBATCH --ntasks-per-node=1
#SBATCH --cpus-per-task=8
#SBATCH --mem=32000
#SBATCH --time=0-03:00:00

#SBATCH --mail-type=ALL
#SBATCH --mail-user=abc123@mail.aub.edu

source /apps/sw/miniconda/etc/profile.d/conda.sh
conda activate pyfluent-2024.1
module load ansys/fluent/R2024.1
python fluent_simulation.py